
Red Velvet Cake Recipe
Hey guys today, let’s make a red velvet cake. it’s perfectly soft and moist. and the process is so simple. let’s get started. first, as a preparation, coat a thin layer of butter on the bottom of the pan. and attach parchment paper as a cake liner. in the bowl, add all the dry ingredients. which is all-purpose flour, baking soda, baking powder, salt, cocoa powder, and granulated sugar. and whisk them together until well combined. and set it aside.
in a separate bowl, add wet ingredients. which are eggs, oil. today, I use olive oil but you can use other regular oil. whole milk, white vinegar, milk and vinegar do a perfect job to replace buttermilk, which is often used to make red velvet cake. vanilla extract, and red food coloring. I’m going to apply a little bit of oil on the teaspoon so that it comes off easily. I used gel paste coloring instead of liquid one to create a much brighter color. and whisk them all together until well combined.
and add the dry ingredients. and mix until very smooth. this cake is so easy, you just have to keep mixing with a whisk. if you want you can also make it with a stand mixer with a paddle attachment. looking good. nice and smooth. and finally, in the small pot, add milk and butter. and heat them at medium heat until the milk starts simmering very gently. pay close attention to it to prevent the milk from over floating. and mix it sometimes to make the temperature even. now we can see it’s gently simmering. so remove it from the heat.
and add about 1/3 to half of the liquid into the cake batter. mix gently in the beginning so that it’s not going to spill everywhere. mix until well combined. and add the remaining liquid. so oftentimes, I like to add hot liquid to oil-based cake batter, especially when it contains chocolate because I feel the texture gets a little bit more fine, the cake gets cooked slightly more evenly, and overall, it tastes a little bit better. now at the very end, scrape off the side and bottom of the bowl.
to ensure everything is evenly incorporated. pour that into the prepared pans. and bake in the preheated oven until the top bounces back gently when you touch it and a toothpick comes out clean with a few crumbs when inserting it in the very center. now, the cake is very soft while it’s hot. so set it aside until it cools down completely. and once cooled, detach the side using a small cake spatula. flip. take off the pan. and flip it back. and this is optional but you can trim the top like this to make it more even.
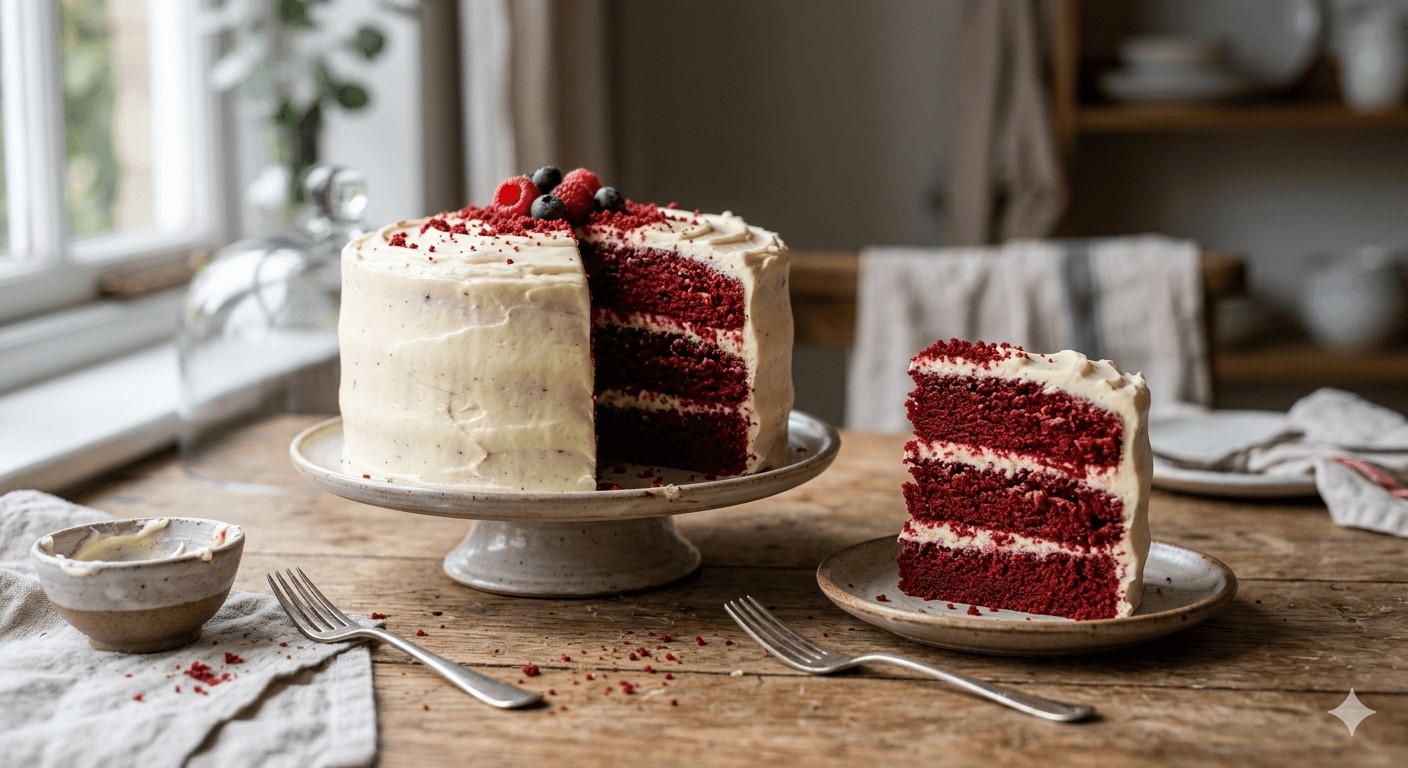
and today, we’re going to use the crumb to decorate the cakes. so I’m going to bake it at 300 F for about 15 minutes until it gets dried. take it out one or two times on the way to ensure it’s evenly cooked. and crush them into smaller pieces each time. you can also bake cupcakes with it. one bunch of the recipe is enough for two dozen cupcakes. this time, I made a half batch for a dozen cupcakes. and now, let’s make the frosting to finish the cake. so this is the cream cheese frosting recipe I shared in the past.
I use this one for all kinds of desserts and cakes. and today, I made the double amount of the original recipe to frost the one 8-inch cake. whip soft butter, powdered sugar, and salt at medium to medium-high speed until it gets very fluffy for about 5 minutes. add cold cream cheese left at room temperature for about 15 minutes. whip it at high speed until evenly combined. using cold cream cheese is the key to making a stiffer frosting. and whip even more to make fluffier frosting. today, I whipped another few minutes.
if you want even stiffer cream cheese frosting, simply double the amount of butter. I am sharing more about it in this tutorial, comparing the two frostings. so check it out if you are interested. drop a big scoop of the frosting and spread it to make it flat. place the second layer on top. drop another big scoop of frosting and spread it all over the surface evenly. and this is the crumb coat so it doesn’t have to be thick. it can be very thin. you just want to seal all the cake and the cake crumbs.
so that they are not going to come out while you are doing the final coat. if you feel the frosting is getting a little bit softer to finish the final coat and then you can chill it in the fridge for some time and come back to make the frosting firmer and of course, you can finish the final coat and the decoration in any way you like. today, I made a little bit rustic look using a cake spatula. so it’s something you can try when you don’t want to use a piping bag and a tip. and if you need to, chill the cake in the fridge for some time before you try the decoration on top of the cake.
to prevent the frosting on the corner from getting squished with the pressure. and finally, the cake is done. this red velvet cake is so soft, moist, and not overly sweet. and with the cream cheese frosting, it tastes exceptional. I hope you’ll give it a try, and if you did, please let me know about how it turned out. wrap the surface tightly and store it in the fridge. the cake stays really moist and soft even in the fridge but I feel it’s a little bit fluffier at room temperature. so leave it at room temperature for some time if you want to enjoy the texture.
you can enjoy this red velvet cake in many shapes and sizes like sheet cake, cupcakes, or smaller cakes. a half batch of this recipe makes about a 6-in cake or a dozen cupcakes. just adjust the baking time accordingly. when i first saw a red velvet cake at the grocery store, I was a little bit intimidated by the look. with the bright light color. but after a while, I had it at the bakery store, and I was very presently surprised with how delicious it was. so never judge cakes with first Impressions sometimes.
but this one. definitely the best one I’ve ever had. it is so soft, fluffy, and perfectly moist. even if you’re not a big fan of red velvet cake, I would love you to try this one. and if you did please let me know about how it turned out and uh how you enjoyed it with your family and friends. that’s it today.
Ingredients
Dry Ingredients
- All-purpose flour
- Baking soda
- Baking powder
- Salt
- Cocoa powder
- Granulated sugar
Wet Ingredients
- Eggs
- Olive oil (or any neutral cooking oil)
- Whole milk
- White vinegar
- Vanilla extract
- Red food coloring (gel paste preferred)
Hot Milk Mixture
- Milk
- Butter
Cream Cheese Frosting
- Unsalted butter, softened
- Powdered sugar
- Salt
- Cream cheese, cold and slightly softened
Optional Decoration
- Cake crumbs (from trimmed cake tops)
Instructions Summary
1. Prepare the Cake Pans
- Grease the bottom of the cake pans with a thin layer of butter.
- Line the pans with parchment paper.
2. Mix the Dry Ingredients
- Combine flour, baking soda, baking powder, salt, cocoa powder, and sugar.
- Whisk until evenly blended.
3. Mix the Wet Ingredients
- In a separate bowl, whisk together eggs, oil, milk, vinegar, vanilla extract, and red food coloring until smooth.
4. Make the Cake Batter
- Add the dry ingredients to the wet ingredients.
- Whisk until the batter is smooth and lump-free.
5. Prepare the Hot Milk Mixture
- Heat milk and butter together until the mixture gently simmers.
- Remove from heat.
6. Finish the Batter
- Gradually mix part of the hot milk mixture into the batter.
- Add the remaining liquid and mix until fully incorporated.
- Scrape the sides and bottom of the bowl to ensure an even batter.
7. Bake the Cake
- Divide the batter between the prepared pans.
- Bake until the cake springs back lightly when touched and a toothpick inserted in the center comes out with a few moist crumbs.
- Allow the cakes to cool completely.
8. Prepare Cake Crumbs (Optional)
- Trim the tops of the cakes if desired.
- Bake the trimmed cake pieces at 300°F (150°C) for about 15 minutes until dry.
- Crush into fine crumbs for decoration.
9. Make the Cream Cheese Frosting
- Beat butter, powdered sugar, and salt until fluffy.
- Add cream cheese and whip until smooth and light.
- Continue whipping for extra volume and texture.
10. Assemble the Cake
- Spread frosting between the cake layers.
- Apply a thin crumb coat.
- Chill if necessary.
- Finish with a final layer of frosting.
- Decorate with cake crumbs or your preferred design.
11. Store and Serve
- Store the cake tightly wrapped in the refrigerator.
- For the softest texture, allow the cake to sit at room temperature before serving.
People Also Ask
1. Why do red velvet cakes use vinegar and milk instead of buttermilk?
Milk and vinegar create a quick buttermilk substitute that provides the acidity needed for a soft, tender crumb and helps activate the baking soda.
2. Why add hot milk and butter to red velvet cake batter?
Adding hot milk and butter can create a finer crumb, encourage more even baking, and enhance the cake’s overall moisture and texture.
3. How can I make cream cheese frosting thicker and more stable?
Use cold cream cheese and increase the amount of butter. Chilling the frosting before decorating can also help maintain a firmer consistency.